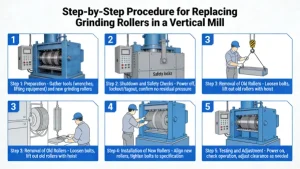
This comprehensive guide covers the complete process of replacing grinding rollers in a vertical roller mill (VRM), including safety precautions, tools required, disassembly, inspection, assembly, and post-installation testing.
1. Pre-Replacement Preparation & Safety Setup
| Task | Details |
|---|---|
| Lockout/Tagout (LOTO) | Perform complete shutdown: cut power, close valves, release pressure, and apply LOTO locks with warning tags to prevent accidental startup |
| PPE Requirements | All personnel wear hard hats, safety glasses, dust masks/respirators, steel-toed boots, gloves, and protective clothing |
| Tool Preparation | Gather hydraulic pumps, torque wrenches, lifting equipment (crane/hoist), roller turning tools, cleaning supplies, and specialized mill tools |
| Parts Readiness | Verify new rollers match mill specifications; inspect for damage, cracks, or defects; prepare gaskets, seals, lubricants, and fasteners |
| Access Preparation | Remove maintenance doors, access panels, and any obstructions; set up scaffolding and fall protection if needed |
| Hydraulic System Setup | Connect hydraulic hoses for roller lifting and turning mechanisms; test for proper operation |
2. Mill Shutdown & Isolation
- Stop feed system and allow mill to run empty for 10-15 minutes to clear remaining material
- Stop main drive motor and auxiliary systems (lubrication, hydraulic, classifier)
- Depressurize hydraulic systems and lock valves
- Disconnect power to all electrical components; verify with voltage tester
- Vent and isolate pneumatic systems
- Allow mill to cool to ambient temperature (critical for bearing inspection)
- Drain lubrication oil from roller assemblies and collect for disposal/recycling
3. Roller Removal Process
Step 3.1: Roller Lifting & Positioning
- Activate hydraulic system to lift rollers 50-100mm above grinding table (do not exceed manufacturer’s limit)
- Install safety blocks to prevent accidental lowering during work
- Connect turning hydraulic cylinders to roller rocker arms
- Carefully rotate rollers to the maintenance position (usually 90° from operating position)
- Secure rollers with mechanical locks or pins before proceeding
Step 3.2: Disassembly of Roller Components
- Remove roller guards, seals, and protective covers
- Disconnect lubrication lines, hydraulic hoses, and temperature sensors
- Loosen and remove fastening bolts/nuts in a symmetrical pattern to prevent uneven stress
- Release expansion sleeves or tapered connections using manufacturer-specified procedures
- Use specialized tools to remove pressure rings and retaining devices
- Attach lifting slings to designated points on the roller assembly
- Carefully lift roller assembly from the mill and place on a stable work surface
Step 3.3: Roller Disassembly (if replacing sleeves only)
- Secure roller on a maintenance stand; remove end caps and seals
- Use hydraulic presses or specialized tools to separate roller sleeves from core
- Remove worn sleeves and inspect roller core for wear, cracks, or damage
- Clean core thoroughly with solvent; check bearing condition and replace if necessary
4. Inspection of Mill Components
| Component | Inspection Points |
|---|---|
| Grinding Table | Check liner wear, cracks, and bolt tightness; measure wear depth |
| Rocker Arms | Inspect for cracks, deformation, and bearing condition |
| Seals & Gaskets | Check for damage, leaks, or wear; replace all seals as standard practice |
| Hydraulic Lines | Inspect for leaks, cracks, or damage; test pressure integrity |
| Lubrication System | Clean filters and check for contamination |
5. New Roller Preparation & Installation
Step 5.1: New Roller Preparation
- Clean all surfaces (shafts, sleeves, and mating parts) with solvent to remove oil, grease, and debris
- Apply thin layer of anti-seize compound to bolt threads and mating surfaces
- Install new seals, bearings, and gaskets per manufacturer specifications
- Fill roller assembly with recommended lubricant to proper level
- Balance new roller assemblies if required (critical for vibration control)
Step 5.2: Roller Installation
- Lift new roller assembly with crane and position carefully in mill
- Align roller with rocker arm and expansion sleeve connection points
- Install tapered expansion sleeves, ensuring proper orientation of openings
- Tighten expansion sleeve bolts incrementally and evenly to specified torque
- Reconnect lubrication lines, hydraulic hoses, and electrical connections
- Install pressure rings and retaining devices; torque to manufacturer specifications
- Reattach roller guards and protective covers
Step 5.3: Roller Positioning & Securing
- Remove mechanical locks and carefully rotate rollers back to operating position
- Lower rollers slowly until they rest lightly on the grinding table
- Remove lifting equipment and hydraulic turning tools
- Reinstall safety devices and interlocks
- Double-check all connections, fasteners, and clearances
6. Post-Installation Checks & Testing
Step 6.1: System Reconnection
- Reconnect all disconnected services (electrical, hydraulic, lubrication, pneumatic)
- Refill lubrication systems with recommended oil/grease
- Bleed air from hydraulic and lubrication lines
- Inspect all connections for leaks
Step 6.2: Functional Testing
- Perform manual rotation test of rollers to ensure smooth operation
- Test hydraulic lifting system through full range of motion
- Check seal integrity with air pressure test if applicable
- Verify proper alignment of rollers with grinding table
Step 6.3: Commissioning
- Conduct dry run without material for 30-60 minutes
- Monitor vibration levels, bearing temperatures, and noise
- Check for abnormal sounds or vibrations
- Gradually introduce material and increase load to operational level
- Perform final inspection of all systems and document results
7. Safety & Maintenance Documentation
- Remove LOTO locks only after all personnel are clear and equipment is verified safe
- Document the entire process, including:
- Date and time of replacement
- Names of personnel involved
- Serial numbers of old and new rollers
- Torque values used for critical fasteners
- Inspection findings and any additional repairs
- Test results and operational parameters
- Update maintenance records and schedule next inspection
8. Critical Safety Precautions
| Risk | Prevention Measure |
|---|---|
| Accidental Startup | Strict LOTO procedures; multiple verification steps |
| Falling Objects | Secure all tools and components; use safety nets; proper lifting practices |
| Hydraulic System Hazards | Lock valves; relieve pressure before disconnection; use proper PPE |
| Bearing Damage | Avoid overheating during disassembly; use proper tools for removal |
| Misalignment | Follow manufacturer’s alignment procedures; use precision measuring tools |
| Fastener Failure | Torque all bolts to specifications; use locking devices where required |
9. Post-Commissioning Monitoring
- Monitor roller performance for first 24-48 hours of operation
- Check bearing temperatures hourly during initial operation
- Inspect for leaks, abnormal noise, or vibration
- Verify product quality and output meet specifications
- Schedule follow-up inspection after 100 operating hours
Note: Always follow the specific procedures provided by your vertical mill manufacturer, as designs and requirements vary between models and brands. This general guide provides a framework but should be adapted to your equipment’s unique specifications .