Adjusting grinding pressure and gap is critical for optimizing efficiency, product quality, and equipment lifespan in roller mills. Below is a systematic approach applicable to common types of roller mills (vertical roller mills, high-pressure grinding rolls/HPGR, and three-roll mills), including safety protocols, step-by-step procedures, and performance monitoring.
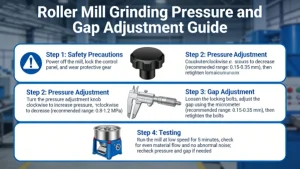
⚠️ Safety First: Non-Negotiable Precautions
Before any adjustments:
- Lockout/Tagout (LOTO): Isolate all energy sources (electrical, hydraulic, pneumatic) and verify machine cannot start accidentally
- Personal Protective Equipment (PPE): Wear safety glasses, gloves, hearing protection, and steel-toe boots
- Consult OEM Manual: Follow manufacturer-specific instructions (procedures vary by model)
- Clear Work Area: Ensure no personnel are in the danger zone
- Inspect Components: Check for wear, damage, or leaks in hydraulic systems, rollers, and adjustment mechanisms
1. Understanding Key Concepts
| Parameter | Definition | Impact |
|---|---|---|
| Static Gap | Distance between rollers at rest (no load) | Determines minimum particle size and throughput |
| Operating Gap | Actual gap during grinding under pressure | Affected by material properties and applied force |
| Grinding Pressure | Force applied to rollers | Controls grinding intensity and energy consumption |
| Roll Parallelism | Alignment of rollers along their length | Ensures uniform particle size and prevents uneven wear |
2. Step-by-Step Adjustment Procedures
2.1 Vertical Roller Mills (VRM)
Grinding Pressure Adjustment (Hydraulic System)
- Initial Setup: Start with manufacturer-recommended pressure (typically 6-9 MPa for new operations)
- Access Hydraulic Station: Locate pressure relief valve and accumulator precharge settings
- Adjust Pressure:
- Increase: Turn relief valve screw clockwise (small increments: 0.2-0.5 MPa)
- Decrease: Turn relief valve screw counterclockwise
- Check Accumulators: Ensure precharge pressure matches system specifications (typically 60-70% of working pressure)
- Balance Pressure: Verify equal pressure across all grinding rollers (critical for stability)
- Test Run: Operate mill for 15-30 minutes and monitor vibration, power draw, and product quality
Gap Adjustment (Material Bed Control)
- Understand Material Bed Thickness: Ideal thickness depends on material properties (typically 25-40 mm for cement clinker)
- Adjust Limit Devices: Set grinding roller limit clearance to maintain target bed thickness
- Calibrate Sensors: Ensure pressure and position sensors are accurately measuring roller movement
- Fine-Tune Feed Rate: Match feed rate to pressure and gap settings for stable operation
2.2 High-Pressure Grinding Rolls (HPGR)
Gap Calibration Procedure
- Zero Gap Setting:
- With mill stopped, slowly close rolls until they make contact (listen for rumble)
- Set this as the zero reference point on adjustment scales
- Static Gap Adjustment:
- Open rolls to desired static gap (typically 15-30 mm for mineral processing)
- Use feeler gauges or laser alignment tools for precision (tolerance: ±0.1 mm)
- Parallelism Check:
- Verify roller parallelism with laser alignment (tolerance: <0.1 mm/m)
- Adjust side bolts equally to maintain alignment
- Pressure Setting:
- Select control mode: constant pressure (most common), constant gap, or hybrid
- Set pressure (typically 10-12 MPa for mineral processing) and ensure hydraulic system stability
2.3 Three-Roll Mills (Laboratory/Coating Applications)
Gap and Pressure Adjustment
- Rough Adjustment: Set initial gaps between rollers (e.g., rear-middle: 0.3 mm, middle-front: 0.1 mm)
- Fine Tuning:
- Use micrometer dials for precise gap control (down to 0.001 mm)
- Adjust pressure screws to achieve uniform material distribution across roller width
- Lock Adjustments: Tighten locking nuts after setting desired gap and pressure
- Test Run: Start mill and check material output for consistent fineness and color distribution
2.4 General Roller Mill (Feed/Grain Processing)
Roll Gap Adjustment
- Stop Feed Flow: Close feed gate completely before adjusting
- Locate Adjustment Bolts: Typically hexagonal or socket head cap screws on both ends of the movable roll
- Zero Reference: Rotate bolts until rolls touch (audible rumble), then back off to zero mark
- Set Target Gap:
- Turn adjustment bolts equally on both sides to maintain parallelism
- Common settings: 1/8″ (3.175 mm) for coarse grinding, 1/32″ (0.794 mm) for fine grinding
- Secure Adjustments: Tighten lock nuts to prevent movement during operation
3. Control Modes: Pressure vs. Gap
| Control Mode | Principle | Best Applications | Advantages |
|---|---|---|---|
| Constant Pressure | Maintain fixed hydraulic pressure; gap adjusts with material variability | Variable feed properties | Consistent grinding intensity, better particle liberation |
| Constant Gap | Maintain fixed roller distance; pressure adjusts with material load | Consistent feed quality | Stable throughput, reduced power fluctuations |
| Hybrid Control | Combine pressure and gap signals for dynamic adjustment | Complex materials requiring precise particle size | Optimal balance of throughput and fineness |
4. Post-Adjustment Performance Monitoring
After making adjustments, monitor these key indicators to validate settings:
- Product Quality:
- Particle Size Distribution (PSD): Use laser diffraction or sieve analysis to verify target fineness
- Uniformity: Check for consistent particle size across the entire product stream
- Operational Parameters:
- Power Draw: Ensure motor load is within safe limits (avoid overamping)
- Vibration: Monitor for excessive vibration (>2.5 mm/s) indicating misalignment or uneven pressure
- Pressure Stability: Pressure fluctuations should be <±0.3 MPa
- Material Bed Thickness: Maintain stable bed for VRM (critical for efficiency)
- Energy Efficiency:
- Specific Energy Consumption (kWh/t): Track energy use per ton of material processed
- Compare with baseline to ensure adjustments improve efficiency
5. Troubleshooting Common Issues
| Problem | Possible Cause | Solution |
|---|---|---|
| Uneven Product Size | Roll misalignment | Recheck parallelism with laser tools; adjust side bolts equally |
| Excessive Vibration | Uneven pressure distribution | Balance pressure across all rollers; check accumulator precharge |
| Low Throughput | Gap too small or pressure too high | Increase gap slightly; reduce pressure incrementally |
| Poor Grinding Efficiency | Pressure too low or gap too large | Increase pressure (0.5 MPa increments); reduce gap slightly |
| Roll Wear | Misalignment or uneven pressure | Realign rollers; balance pressure; inspect roller surfaces for damage |
6. Best Practices for Optimal Results
- Start Conservatively: Begin with lower pressure and wider gap, then gradually adjust upward
- Document Everything: Record pressure, gap settings, material properties, and performance metrics for future reference
- Regular Calibration: Recheck settings every 8-12 hours of operation or after significant changes in feed material
- Roll Maintenance: Inspect rollers weekly for wear; re-groove or replace when necessary
- Training: Ensure operators are properly trained in adjustment procedures and safety protocols
Final Note: Always prioritize manufacturer guidelines for your specific roller mill model. The procedures outlined here provide general guidance but may need modification for your equipment. For complex adjustments or persistent issues, consult a qualified service technician or the OEM’s technical support team.