Always LOTO before opening; use compressed air (0.6-0.8 MPa) and non-sparking tools for routine cleaning; prioritize classifier wheel and air channels for blockages; avoid abrasive cleaners; and validate airflow/balance post-reassembly.
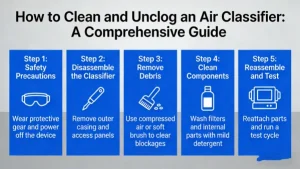
Safety First: Preparation & Isolation
- Emergency Shutdown: Press E-Stop, cut power to main motor, fan, and feeder; confirm all rotating parts have fully stopped
- LOTO (Lockout/Tagout): Apply locks and tags to all energy sources; verify isolation with a voltage tester
- Pressure Release: Open bleed valves to depressurize the system; ensure no residual pressure remains
- PPE: Wear dust mask/respirator (N95+), safety goggles, chemical-resistant gloves, anti-static clothing, and steel-toe boots
- Ventilation: Activate local exhaust ventilation (LEV) or work in well-ventilated area; monitor dust concentration
- Tools Readiness:
- Non-sparking tools (brass/copper scrapers, brushes)
- Compressed air (0.6-0.8 MPa) with nozzle and extension
- Vacuum (HEPA-filtered, explosion-proof if needed)
- Plastic scrapers, soft-bristle brushes, lint-free cloths
- Mild detergent (non-abrasive, water-based)
- Flashlight, inspection mirror, and camera for hard-to-reach areas
Routine Cleaning vs. Unclogging: What’s the Difference?
| Task | Frequency | Focus Areas | Tools |
|---|---|---|---|
| Routine Cleaning | Daily/Weekly | Exterior, inlet/outlet, fans, dust collection | Cloth, vacuum, mild detergent |
| Preventive Cleaning | Monthly/Quarterly | Classifier wheel, air channels, seals | Compressed air, soft brushes |
| Unclogging | As needed | Blocked feed pipes, classifier wheel, discharge | Scrapers, compressed air, disassembly tools |
Step 1: Exterior & Access Points Cleaning
- Wipe down exterior surfaces with a damp cloth and mild detergent solution; avoid electrical components
- Vacuum dust from motor housings, fan shrouds, and control panels
- Clean inlet/outlet flanges; inspect gaskets for wear/damage; replace if needed
- Check and clean sight glasses; ensure visibility for internal inspection
Step 2: Disassembly for Internal Access
- Open inspection hatches (hinged covers) following manufacturer’s instructions
- Remove feed pipe/inlet stub if accessible; inspect for material buildup
- For classifier wheel access:
- Remove retaining nut/washer and carefully slide the wheel off the shaft
- Note orientation for correct reassembly
- Document disassembly steps with photos for reference
Step 3: Targeted Cleaning Procedures
3.1 Classifier Wheel Cleaning (Critical!)
- Dry Cleaning: Use compressed air to blow loose particles from blades (hold nozzle at 45° angle, 15-20 cm distance)
- Manual Removal: Gently scrape stubborn deposits with plastic/non-sparking tools; avoid blade damage
- Wet Cleaning (if allowed by manufacturer):
- Use mild detergent solution (max 40°C)
- Soft brush to clean between blades
- Rinse thoroughly with clean water
- Air-dry completely (min 24 hours) before reassembly
- Inspection: Check for blade wear, cracks, or imbalance; replace damaged parts
3.2 Air Channels & Ductwork Cleaning
- Start from upstream to downstream:
- Feed pipe → classifier chamber → fines discharge → coarse return
- Use compressed air to dislodge buildup; follow with vacuum to capture debris
- For sticky materials (moisture >5%):
- Apply dry ice or low-pressure steam (if compatible) to embrittle deposits
- Scrape carefully with non-metallic tools
- Inspect for leaks/damage; seal gaps with high-temperature sealant if needed
3.3 Feed System & Discharge Cleaning
- Clear feed hopper using vacuum and scrapers; check for bridging or rat-holing
- Clean feeder mechanism (screw/vibratory) and sensors; remove material buildup
- Inspect discharge chutes/valves (rotary airlock, double-flap); ensure free movement
- Clean product collection bins; remove accumulated fines that could re-enter the system
Step 4: Unclogging Techniques for Common Blockages
4.1 Feed Pipe Blockage
- Symptoms: No material flow, increased motor current, pressure drop
- Solutions:
- Use a flexible rod or compressed air to break up the blockage from both ends
- For severe cases: Remove the pipe section and clean externally
- Install air cannons or vibrators as preventive measures for future issues
4.2 Classifier Wheel Blockage
- Symptoms: Reduced airflow, product contamination, vibration, fan overload
- Solutions:
- Stop rotation immediately (prevents damage)
- Remove the wheel and clean each blade individually
- Check for agglomeration causes (moisture, static, or chemical reactions)
- Adjust feed rate or add drying if material moisture >5%
4.3 Air Channel Blockage
- Symptoms: Uneven airflow, pressure fluctuations, poor classification efficiency
- Solutions:
- Use compressed air with extension nozzle to reach deep blockages
- Install access ports at critical points for easier future cleaning
- Verify airflow balance post-cleaning with manometers
Step 5: Deep Cleaning (Quarterly/As Needed)
- Full Disassembly: Follow manufacturer’s manual to remove classifier wheel, liners, and baffles
- Component Cleaning:
- Liners: Remove with backing rings; clean with mild detergent; inspect for wear
- Seals: Clean with lint-free cloth; replace worn/damaged seals
- Bearings: Wipe exterior; do not wash (re-lubricate per schedule)
- CIP (Clean-in-Place): For systems with CIP capability:
- Fill with cleaning solution (follow manufacturer specs)
- Circulate for recommended time (typically 30-60 minutes)
- Rinse thoroughly with clean water
- Dry completely before restarting
Step 6: Reassembly & Validation
- Reinstall Components:
- Ensure all parts are dry and free of debris
- Reattach classifier wheel with correct torque (use torque wrench)
- Replace gaskets and seals; tighten flanges uniformly
- Pre-Start Checks:
- Verify all connections are secure
- Rotate classifier wheel manually to check for binding
- Check fan rotation direction
- Inspect LOTO removal and safety interlocks
- Test Run:
- Start with no load; monitor vibration, noise, and temperature
- Gradually increase feed rate while checking:
- Airflow pressure (should match design specs)
- Product quality (particle size distribution)
- Power consumption (no abnormal spikes)
- Performance Validation:
- Compare with baseline performance data
- Check classifier efficiency and product yield
Troubleshooting Common Post-Cleaning Issues
| Problem | Possible Cause | Solution |
|---|---|---|
| Vibration | Unbalanced classifier wheel, loose parts | Recheck wheel balance; tighten all connections |
| Reduced Efficiency | Incomplete cleaning, airflow leaks | Reclean critical areas; inspect seals and gaskets |
| Frequent Blockages | High moisture, oversized particles | Add drying step; install pre-screening |
| Product Contamination | Cleaning agent residue | Rinse thoroughly with clean water |
Preventive Maintenance to Avoid Future Clogs
- Scheduled Cleaning:
- Daily: Visual inspection, exterior cleaning
- Weekly: Inlet/outlet cleaning, fan maintenance
- Monthly: Classifier wheel and air channel cleaning
- Quarterly: Full disassembly and deep cleaning
- Process Optimization:
- Control feed moisture (<5% for most minerals)
- Maintain consistent feed rate (avoid overloading)
- Optimize airflow to prevent material buildup
- Install deflector plates in problematic areas
- Monitoring:
- Install pressure sensors to detect blockages early
- Use vibration analysis for predictive maintenance
- Track power consumption trends
Key Do’s and Don’ts
✅ Do’s:
- Follow manufacturer’s cleaning guidelines
- Use only non-abrasive cleaning agents
- Keep records of cleaning dates and issues
- Train operators on proper cleaning procedures
❌ Don’ts:
- Never clean while equipment is running
- Avoid water on electrical components
- Don’t use metal tools on classifier wheel blades
- Never skip LOTO procedures
- Don’t mix different cleaning agents
Cleaning and unclogging an air classifier is critical for maintaining product quality, energy efficiency, and equipment lifespan. For sticky materials (e.g., graphite, calcium carbonate with high moisture), increase cleaning frequency and consider adding anti-static agents or temperature control to prevent agglomeration. Always refer to your specific equipment manual for model-specific procedures and torque specifications.