Quick Summary: Grinding pressure is adjusted via the hydraulic system (main pressure) and nitrogen accumulators (dynamic pressure stability), balanced across rollers, and optimized with material properties and operational parameters. Use gradual adjustments (≤5% per step) and monitor vibration, power, and product quality closely .
1. Understanding Grinding Pressure Fundamentals
Vertical roller mills (VRMs) use hydropneumatic systems to apply force between grinding rollers and the rotating table . Pressure directly impacts:
- Production capacity: Higher pressure increases throughput until a critical point
- Energy consumption: Specific power rises with pressure
- Product fineness: Finer particles at higher pressure (up to a limit)
- Equipment vibration: Both high and low pressure can cause excessive vibration
- Component wear: Excessive pressure accelerates roller and table liner wear
2. Preparation & Safety Precautions
| Step | Action | Purpose |
|---|---|---|
| Lockout/Tagout | Isolate hydraulic power source and mill drive | Prevent accidental activation |
| Pressure Relief | Depressurize hydraulic system before adjustments | Avoid sudden pressure release |
| Parameter Check | Verify current pressure, vibration, and power readings | Establish baseline |
| Tool Preparation | Gather pressure gauges, wrenches, nitrogen charging kit | Ensure proper equipment |
| Team Briefing | Coordinate with operators and maintenance | Safe communication during adjustment |
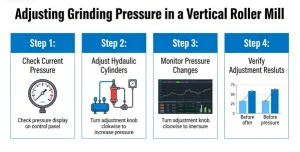
3. Adjustment Methods (Step-by-Step)
3.1 Hydraulic System Pressure Adjustment (Primary Control)
-
Locate the main pressure control valve (usually an overflow or proportional valve) on the hydraulic power unit
-
Adjust in small increments (≤5% of current setting per step):
- Increase pressure: Turn adjustment screw clockwise
- Decrease pressure: Turn adjustment screw counter-clockwise
-
Monitor pressure gauge until desired value is reached
-
Lock adjustment screw to prevent vibration-induced changes
-
Verify pressure stability for 10–15 minutes under load
3.2 Nitrogen Accumulator Pressure Adjustment (Dynamic Stability)
Accumulators maintain consistent pressure during dynamic loading and absorb shocks .
-
Check manufacturer’s specifications for optimal ratio (typically 50–70% of hydraulic pressure)
-
Calculate target pressure:
- Optimal: 0.5–0.6 × hydraulic pressure
- Minimum: 0.33 × hydraulic pressure
- Maximum: 0.66 × hydraulic pressure
-
Charge/discharge nitrogen:
- Use nitrogen charging kit with pressure regulator
- Add nitrogen: Connect to charging valve and slowly increase pressure
- Release nitrogen: Use bleed valve for precise reduction
-
Equalize all accumulators (one per roller) for balanced pressure distribution
3.3 Roller Pressure Balancing (Critical for Vibration Control)
-
Check individual roller pressure readings (if available)
-
Adjust each roller’s hydraulic cylinder independently to match target pressure
-
Verify balance by monitoring:
- Vibration amplitude (should be ≤2–3 mm/s)
- Equal current draw across all roller hydraulic circuits
- Uniform material bed thickness across the grinding table
4. Operational Parameter Optimization
Grinding pressure must align with other key variables:
| Parameter | Relationship with Grinding Pressure | Adjustment Guidelines |
|---|---|---|
| Material Feed Rate | Pressure ↑ → Can handle higher feed rates | Match pressure increases with 5–10% feed rate increases |
| Material Hardness | Harder materials need higher pressure | Adjust +10–15% for materials with Mohs hardness >6 |
| Feed Particle Size | Larger particles require higher pressure | Increase pressure by 5–8% for each 10% increase in max particle size |
| Material Moisture | Higher moisture may need slightly higher pressure | Adjust +3–5% for moisture >12% |
| Air Flow Rate | Pressure ↑ → May need higher air flow to maintain material bed | Balance pressure and air flow to keep differential pressure stable |
| Classifier Speed | Pressure ↑ → Finer product may require higher classifier speed | Coordinate adjustments for desired fineness |
5. Monitoring & Fine-Tuning
-
Key Parameters to Track:
- Grinding pressure (hydraulic and accumulator)
- Mill vibration (critical indicator of balance and material bed stability)
- Main motor power consumption
- Product fineness (particle size distribution)
- Material bed thickness (100–150 mm typical, depending on material)
- System pressure difference (mill inlet vs. outlet)
-
Fine-Tuning Protocol:
- Make one adjustment at a time and allow 15–30 minutes for stabilization
- If vibration exceeds limits (≥4 mm/s), reduce pressure immediately
- If power consumption rises without production increase, pressure is likely excessive
- For best efficiency, find the pressure where marginal gain in output equals marginal power increase
6. Troubleshooting Common Issues
| Symptom | Possible Cause | Solution |
|---|---|---|
| High Vibration | Pressure too high/low, unbalanced rollers, thin material bed | Reduce pressure 5–10%, balance rollers, adjust feed rate |
| Low Production | Insufficient pressure for material properties | Increase pressure 5–10%, check for worn liners |
| Excessive Power Draw | Pressure too high, no productivity gain | Reduce pressure incrementally |
| Uneven Wear on Rollers | Unbalanced pressure between rollers | Re-balance roller pressures, check hydraulic system for leaks |
| Fluctuating Pressure | Accumulator nitrogen pressure incorrect, hydraulic leaks | Adjust accumulator pressure, inspect hydraulic lines |
7. Best Practices Summary
-
Start with manufacturer’s recommended baseline pressure for your specific material
-
Adjust gradually (≤5% per step) to avoid process instability
-
Maintain pressure balance across all rollers to prevent vibration and uneven wear
-
Optimize accumulator pressure (50–70% of hydraulic pressure) for dynamic stability
-
Monitor continuously during operation and adjust for changing material conditions
-
Document all adjustments and corresponding performance changes for future reference
By following this structured approach, you can achieve optimal grinding pressure that maximizes production efficiency while minimizing energy consumption and equipment wear. Always refer to your specific mill manufacturer’s manual for model-specific procedures and safety guidelines.